Using the BME680 sensor with nvidia jetson boards part I

Bosch’s BME680 is a very interesting component. It is a four in one sensor, which can measure temperature, humidity, pressure and air quality. Unfortunately there is no official support for using the sensor with arm64 linux. This article shows a kernel based approach to use this sensor with NVIDIA’s arm64 based Jetson boards.

bme680 sensor breakout board which is connected to a NVIDIA Jetson TX2

Connecting the sensor
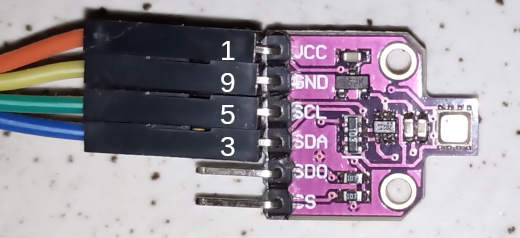
First of all the sensor has to be connected to an i2c port of the Jetson board. There is no difference whether we use a TX2, Nano or Xavier board for this. The pin Layout of the Raspberry based GPIO connector (for example J12 on Xavier NX, J42 on Nano and J21 on TX2)123 is the same with all these boards. After connecting the sensor to the pins 1-9-5-3, as shown above, we can check the connection using i2detect. If we can see a device with i2c address 0x77 or 0x76 everything is connected properly.

root@jetson:/usr/src# i2cdetect -ry 1
WARNING! This program can confuse your I2C bus, cause data loss and worse!
I will probe file /dev/i2c-1 using receive byte commands.
I will probe address range 0x03-0x77.
Continue? [Y/n] 
     0  1  2  3  4  5  6  7  8  9  a  b  c  d  e  f
00:          -- -- -- -- -- -- -- -- -- -- -- -- -- 
10: -- -- -- -- -- -- -- -- -- -- -- -- -- -- -- -- 
20: -- -- -- -- -- -- -- -- -- -- -- -- -- -- -- -- 
30: -- -- -- -- -- -- -- -- -- -- -- -- -- -- -- -- 
40: -- -- -- -- -- -- -- -- -- -- -- -- -- -- -- -- 
50: -- -- -- -- -- -- -- -- -- -- -- -- -- -- -- -- 
60: -- -- -- -- -- -- -- -- -- -- -- -- -- -- -- -- 
70: -- -- -- -- -- -- -- 77                       

Building the kernel modules
During Google Sommer of Code 2018 Himanshu Jha has developed a kernel based driver for the bme680 sensor4. The kernel supplied by nvidia (4.9.140) does not support the BME680 sensor. Mainline kernel started supporting this sensor with version 4.19. Fortunately the required kernel module can also be built against the older NVIDIA supplied kernel. So we just have to get the kernel source of a kernel version supporting the sensor. This time we will use the most recent 4.19 kernel:

wget http://www.kernel.org/pub/linux/kernel/v4.x/linux-4.19.116.tar.gz

We just need to extract the drivers/iio/chemical subtree of the kernel source for building the bme680 sensors kernel module.

tar --strip-components=3 -xzf linux-4.19.116.tar.gz linux-4.19.116/drivers/iio/chemical

After extracting, we have to configure the build. To do so, prepend the following lines to the Makefile in this subtree:

CONFIG_BME680=m
CONFIG_BME680_I2C=m

Afterwards build the kernel module5 and install the binaries to the modules folder:

make -C /lib/modules/`uname -r`/build M=$PWD
make -C /lib/modules/`uname -r`/build M=$PWD modules_install

Once the kernel modules have been installed as shown above, we can load the the kernel module with modprobe bme680_i2c. This can be automated on startup by adding the module to /etc/modules-load.d/modules.conf.

Using the sensor via sysfs
To use the sensor we have to register it with the kernels i2c subsystem6. This could be added to a startup script, for example /etc/rc.local.

echo bme680 0x77 > /sys/bus/i2c/devices/i2c-1/new_device

Depending on sensor configuration the i2c address can be 0x76 or 0x77. Once the sensor is registered, the sensors readings can be acquired using the sysfs interface:

grep ^ /dev/null /sys/bus/i2c/devices/i2c-1/1-0077/iio_device/*input*
/sys/bus/i2c/devices/i2c-1/1-0077/iio_device/in_humidityrelative_input:45.503000000
/sys/bus/i2c/devices/i2c-1/1-0077/iio_device/in_pressure_input:1005.830000000
/sys/bus/i2c/devices/i2c-1/1-0077/iio_device/in_resistance_input:60726
/sys/bus/i2c/devices/i2c-1/1-0077/iio_device/in_temp_input:25100

Unfortunately the kernel driver does not support the calibration of the sensor and just outputs the resistance value of the air quality sensor. So calculating CO2 equivalent or air quality from the sensors readings has to be done in userspace. Usually this calculation is being done using Bosch’s closed source BSEC library which cannot be used on arm64 architecture or within kernel context. A promising approach on self-calculating the air quality from the raw sensors readings has been shown in pimoronii forums7. According to this, the IAQ8 air quality index ranging from 0 to 500, can be calculated from the bme680 readings using the following formula:

iaq = log(gas_reading) + 0.04 * humidity_reading

For completeness, the bme680 device can be unregistered6 from the kernels i2c subsystem as follows:

echo 0x77 > /sys/bus/i2c/devices/i2c-1/delete_device

Jürgen

References:
1. jetsonhacks.com: jetson-tx2 pinout
2. jetsonhacks.com: jetson-nano pinout
3. jetsonhacks.com: jetson-xavier-nx pinout
4. himanshujha199640.wordpress.com: bme680 driver
5. kernel.org: external modules build
6. erlerobotics.gitbooks.io: i2c kernel devices
7. pimoronii forums: calculation air quality from bme680 readings
8. wikipedia.org: Air quality index

1 Star2 Stars3 Stars4 Stars5 Stars (No Ratings Yet)
Loading...

exFAT/NTFS support for the Cosmo Communicator

Cosmo with exfat formatted micro sd card
Cosmo Communicator with exfat formatted micro sd card

Unfortunately the Cosmo Communicator, like many other Android phones, does not support the exFAT filesystem. Most vendors do so due to exFAT being covered by software patents in the USA, which is a problem for companies selling to the USA. exFAT might not be the most sophisticated filesystem available, but is needed for interoperability with other devices and to get rid of the 4GB file size limit of fat32. This article shows how to enable exFAT support for the Cosmo. Since it is not much effort to also get NTFS support this is done by the way.

Setup the kernel sources

To get exfat support, first of all we need a kernel module providing exfat support. Fortunately some time ago Samsung has released their exfat driver under the GPL license. The derivate of this driver can be found on github¹ This module has to be built against the kernel used on the device. The kernel source for the Cosmo has also been made available on github². The two source trees can be combined, as described in the documentation for the exfat module by editing the relevant Makefile an Kconfig. Furthermore CONFIG_EXFAT_FS for exFAT support CONFIG_NTFS_FS for NTFS have to be enabled as modules in kernel configuration. The resulting kernel source tree with the included exfat submodule has been placed on github.

Setup the build environment

To build the kernel modules on better uses a compiler that is as near as possible to the one that has been originally for building the kernel. We can easily find this out via procfs on the target device.

clang version used for the Cosmos kernel build

When compiling on an arm64 system the build environment can easily be installed. I.e. by executing apt install llvm clang on an Ubuntu arm64 system. When using a different architecture for compiling, the appropriate cross toolchain has to be installed.

Build the kernel modules

Once all is set up the kernel modules can be built.

make O=../KERNEL_OUT -C cosmo-linux-kernel-4.4 ARCH=arm64 k71v1_64_bsp_defconfig

make -j4 O=../KERNEL_OUT ARCH=arm64  CC=clang  CLANG_TRIPLE=aarch64-linux-gnu- CROSS_COMPILE=aarch64-linux-gnu- modules

As result we get the two kernel modules ntfs.ko and exfat.ko

Creating a magisk module

The resulted kernel modules have to get loaded on Android startup. Starting with Android Pie it is not possible any more to mount the system partition for writing. One possibility would be to create an own system image containing the kernel modules and necessary scripts. Since Magisk is the recommended way for rooting the Cosmo Communicator anyways, we can take a different approach. Fortunately Magisk gives the possibility to create on overlay filesystem which gets injected into the android system partition, so we can get the same result with less effort.

To create the Magisk module containing the filesystem support we start with the Magisk Module Template4 and copy the two kernel modules to system/lib/modules/. Furthermore we need some additional binaries for filesystem checking and mounting. So we add the filesystem support binaries and volume daemon built for the Pixel 2 from fsbinaries.zip and Magisk-v18.1-extrafs.zip³. Next we need a service.sh script which loads the kernel modules on startup an restarts vold once the user is present. With an earlier restart the volumes do not get added.

#!/system/bin/sh

# load kernel modules
insmod /system/lib/modules/exfat.ko

# kernel ntfs support is ro
# comment this line to use fuse ntfs (rw)
insmod /system/lib/modules/ntfs.ko

_SLEEP_INTERVAL=2

# wait for startup
while [ "$(getprop sys.boot_completed)" != "1" ]; do
    sleep ${_SLEEP_INTERVAL}
done

# wait user to unlock
while dumpsys trust | grep -c "deviceLocked=1"; do
    sleep ${_SLEEP_INTERVAL}
    echo "device locked"
    echo $(dumpsys trust | grep -c "deviceLocked=1")
done

#kill vold to restart
killall vold
echo "vold restarted"

One can comment the line loading the ntfs module to decide whether ntfs kernel support, which is read only or fuse ntfs, which is read/write shall be used. For this a simple wrapper script replacing mount.ntfs has been added.

#!/system/bin/sh
# call mount for in kernel ntfs and mount.ntfs3g without
if cat /proc/filesystems | grep "ntfs" &> /dev/null ; then
  echo "using kernel ntfs (ro)"
  params=$(echo "$@" | sed 's/,shortname=mixed//')
  params=$(echo "$params" | sed 's/,dirsync//')
  mount $params
  echo no ntfs.ko
  mount.ntfs3g $@
else
  echo "using fuse ntfs (rw)"
  mount.ntfs3g $@
fi

Finally LATESTARTSERVICE=true has to be set config.sh to execute the service.sh script on startup and some Selinux policies have to be added to avoid the need of running in permissive mode.

The final result can be found on github. For those who do not want to perform the procedure or parts of it themselves, the installable Magisk module can be downloaded from here:

cosmo-fs.zip (676 downloads )

It can be installed using the Magisk Manager App. Best for all users would be if Planet Computes could include this in the stock ROM. This would give exFAT/NTFS support also for non-rooted devices. Assuming they are fearing software patents, they might consider joining the Open Invention Network to get access to the relevant Microsoft patents in the future.

Jürgen

References:
1. exfat kernel module
2. cosmo communicator kernel source
3. filesystem support binaries
4. Magisk Module Template
5. Magisk module developers guide

1 Star2 Stars3 Stars4 Stars5 Stars (1 votes, average: 5.00 out of 5)
Loading...

Modular kernel for the Gemini PDA available from the gemian repository

Recently Adam Boardman and I have managed to integrate the modular kernel for the Gemini PDA into the gemian kernel repository. So, from now on, whenever the kernel gets improved, the modular kernel gets built and the update is available for Debian via apt.

Installing the modular kernel

From now on, the modular kernel for the Gemini PDA can be installed easily using apt:

sudo apt install gemian-modular-kernel

When using the new bootloader the kernel gets flashed to the boot partition automatically. This works because the new bootloader passes the current boot partition’s name to the kernel using the kernel cmdline. The cmdline can be examined with:

cat /proc/cmdline

When using the old bootloader with the Gemini PDA this information is not available to the kernel and consecutively to the operating system, thus one still has to flash the kernel image manually after installing or updating the kernel package. For this one has to carefully decide which boot partition the Linux system is being booted from. Using the wrong partition name can render other installed operating systems unbootable. To recover, flashing the wrongly overwritten boot partition using the flash tool might be necessary. When knowing the boot partition the new kernel can be flashed using dd (the X in bootX has to be replaced with the number of the boot partition) as shown below.

sudo dd if=/usr/share/kernel/linux-boot.img of=/dev/disk/by-partlabel/bootX

After flashing the kernel the either or the other way a reboot is necessary. The boot partition number can be determined from the scatter file that has been used initially to flash the Gemini. Alternatively it can be found out from the key combination that has been used to boot the Gemini. Detailed information on this can be found in the Gemini bootloader documentation.

Building out of tree modules

For building out of tree modules with the Gemini (in example for using USB devices that are not supported with the kernel), in addition to the kernel, the kernel-headers package has to be installed:

sudo apt install gemian-modular-kernel-headers

With the kernel headers and the appropriate build toolchain (gcc, etc.) additional kernel modules can be compiled on the Gemini. Instructions on how to do this can usually be found with the module source.

Some prebuilt modules (iptables mirror target, frandom, 88XXau) for the kernel can be downloaded below:

gemini-modules-extra-3.18.41.tar.gz (660 downloads )

To use the modules, the downloaded archive has be extracted to the root directory. Afterwards depmod has to be executed:

cd /; sudo tar -xzf /path/to/gemini-modules-extra-3.18.41.tar.gz; sudo depmod

With high probability these modules should still be usable after upgrading the modular kernel to a newer build.

regards
Jürgen

1 Star2 Stars3 Stars4 Stars5 Stars (2 votes, average: 5.00 out of 5)
Loading...

Building a kernel module for the awus1900 Wifi stick and the Gemini PDA

A few days ago I have been asked if it is possible to build a driver for the awus1900 Wifi stick for the Gemini PDA. To be honest, I did not know, so I gave it a try.

The awus1900 uses Realtek’s rtl8814au chipset. The Linux driver for this chipset is available at many locations around the net. Most ones, I have tried, have not been compilable against the Gemini’s kernel. The driver at https://github.com/aircrack-ng/rtl8812au has been compilable with some minor modifications against the kernel source used for the kernel in Modular Linux kernel for the Gemini PDA with lid close fix.

First of all some parameters in the Makefile had to be changed to match the Gemini:

  • CONFIG_PLATFORM_I386_PC = n (disable x86 build)
  • CONFIG_PLATFORM_ARM64_RPI = y (enable arm64 build)

Some more parameters have been enabled for features in the hope that these do not cause problems:

  • CONFIG_POWER_SAVING = y
  • CONFIG_USB_AUTOSUSPEND = y
  • CONFIG_80211W = y

With all these changes the build fails complaining about STATION_INFO_SIGNAL and many more being undeclared. The module’s source expects these defines to be present in the kernel source for kernels below version 4.0. Most probably the Gemini kernel tree is different than other 3.x trees. So the line 23

#if (CFG80211_API_LEVEL >= KERNEL_VERSION(4, 0, 0))

in os_dep/linux/ioctl_cfg80211.c has been replaced with

#ifndef STATION_INFO_SIGNAL

to get the module source build against the Gemini’s kernel. Afterwards it has been possible to cross compile the kernel module by running make:

make ARCH=arm64 KSRC=/path_to_lib_modules_dir/3.18.41+/build

After building the module it can be copied to /lib/modules/3.18.41+/extra/ (or any other proper directory) on the Gemini and used afterwards. For those who do not want to build the module themselves, the binary modules for the kernel shared in the article Modular Linux kernel for the Gemini PDA with lid close fix can be downloaded from here: rtl88XX.zip (465 downloads )

Regards
Jürgen

1 Star2 Stars3 Stars4 Stars5 Stars (1 votes, average: 5.00 out of 5)
Loading...

udev-182 needs CONFIG_ DEVTMPFS in kernel

After the latest upgrades on my gentoo vserver system running a 3.3.0 Linux  vserver-kernel (vserver-sources-2.3.3.1), the system did not start up properly anymore. No kernel modules got loaded and even the network devices have not been available after a reboot. This is more or less the worst case, since then one has to be physically in front of the machine and can not repair the system via ssh remote login.

The kernel upgrade was not the reason for this,  but the upgrade to udev-182. This is what the log said:

Mar 21 17:20:05 mittelerde /etc/init.d/sshd[5563]: ERROR: cannot start sshd as net.eth0 would not start
Mar 21 17:20:09 mittelerde /etc/init.d/udev-mount[6075]: Udev uses a devtmpfs mounted on /dev to manage devices.
Mar 21 17:20:09 mittelerde /etc/init.d/udev-mount[6076]: This means that CONFIG_DEVTMPFS=y is required
Mar 21 17:20:09 mittelerde /etc/init.d/udev-mount[6077]: in the kernel configuration.
Mar 21 17:20:09 mittelerde /etc/init.d/udev-mount[6067]: ERROR: udev-mount failed to start
Mar 21 17:20:09 mittelerde /etc/init.d/udev[6066]: ERROR: cannot start udev as udev-mount would not start
Mar 21 17:21:06 mittelerde /etc/init.d/net.eth0[6463]: ERROR: interface eth0 does not exist

With the information “CONFIG_DEVTMPFS=y is required” the log contains the necessary hint to get things to work. The CONFIG_DEVTMPFS option had to be enabled in the kernel. Afterwards the kernel has to be recompiled. The option can be found in menuconfig under Device Drivers-> Generic Driver options and is called Maintain a devtmpfs filesystem to mount at /dev.  For getting the devfs automatically mounted at boot time it makes sense to also enable the option Automount devtmpfs at /dev, after the kernel mounted the rootfs (CONFIG_DEVTMPFS_MOUNT).

It is safe to enable these options with older udev versions. Doing so protects your system from not working any more when you get the udev update later.

Jürgen

1 Star2 Stars3 Stars4 Stars5 Stars (2 votes, average: 5.00 out of 5)
Loading...

nvidia-drivers-295.17 solve black screen problem

Using nvidia linux drivers from version 270.X to 275.X with some graphics boards, in example the Quadro FX 350M which is built into the Dell Precision M65 notebook,  resulted in a black screen or window for OpenGL applications. Even glxgears did only output a black window. The problem has been discussed on forums.opensuse.org. A downgrade to a lower driver version, in example the version 260.X drivers is not applicable anymore, since these drivers do dot build against a recent linux-3 kernel. A upgrade to newer drivers also was not possible, since driver versions from 285.X to 295.10 did not work at all for this graphics board. Recently version 295.17 of nvidias beta driver has become available, which solves this issue. Download links are available on nvnews.net.

For gentoo users I have modified the nvidia-drivers  ebuild for the 295.17 driver. You can download my modified overlay, [download#83] and extract it in /usr/local/portage. Be sure to include the following line in your /etc/make.conf:

PORTDIR_OVERLAY=”/usr/local/portage”

Afterwards you may emerge nvdidia-drivers-295.17.

Jürgen


1 Star2 Stars3 Stars4 Stars5 Stars (No Ratings Yet)
Loading...

tuxonice problems with nvidia-drivers-270.41.06

A few days ago nvidia-drivers-270.41.06 appeared in the gentoo partage tree. During my regular updates it got installed. Afterwards turonice did not work anymore with the configuration I wrote about in zen-sources-2.6.38_p20110501 with tuxonice.

The dmesg output during supend to disk was:

Freezing processes & syncing filesystems.
Stopping fuse filesystems.
Freezing user space processes … (elapsed 0.01 seconds) done.
Stopping normal filesystems.
Freezing remaining freezable tasks … (elapsed 0.01 seconds) done.
Preparing Image. Try 1.
Restarting normal filesystems.
Stopping fuse filesystems.
Freezing user space processes … (elapsed 0.00 seconds) done.
Stopping normal filesystems.
Freezing remaining freezable tasks …
Freezing of tasks failed after 20.00 seconds (1 tasks refusing to freeze, wq_busy=0):
khugepaged      R  running task        0   619      2 0x00800000
ffff88004ef24fa0 ffffffff81692eb9 ffff88004ef24fa0 ffff8800cf13e0c0
ffff8800c861e000 ffff8800c861e010 ffff8800c861e000 ffff8800cf13e330
ffff8800c861ffd8 ffff8800c861e010 ffff8800cf13e148 ffff8800cf13e330
Call Trace:
[<ffffffff81692eb9>] ? schedule+0x729/0xea0
[<ffffffff8169308b>] ? schedule+0x8fb/0xea0
[<ffffffff8110d4ab>] ? __page_check_address+0x10b/0x190
[<ffffffff8110d9f6>] ? page_referenced_one+0x96/0x220
[<ffffffff8110eb7a>] ? page_referenced+0x2da/0x370
[<ffffffff810f13fd>] ? shrink_page_list+0x21d/0x5d0
[<ffffffff810f1b9e>] ? shrink_inactive_list+0x15e/0x4d0
[<ffffffff812d74b8>] ? __next_cpu+0x18/0x30
[<ffffffff8103877b>] ? resched_best_mask+0x3b/0xd0
[<ffffffff810f22bb>] ? shrink_zone+0x3ab/0x500
[<ffffffff810f32bf>] ? do_try_to_free_pages+0xcf/0x470
[<ffffffff810f3965>] ? try_to_free_pages+0xa5/0x1c0
[<ffffffff810e7d5c>] ? __alloc_pages_nodemask+0x49c/0x900
[<ffffffff81050496>] ? try_to_del_timer_sync+0x76/0x110
[<ffffffff81050690>] ? process_timeout+0x0/0x10
[<ffffffff81126461>] ? khugepaged_alloc_hugepage+0x51/0xe0
[<ffffffff81061c70>] ? autoremove_wake_function+0x0/0x30
[<ffffffff811266bd>] ? khugepaged+0xad/0x10e0
[<ffffffff81061c70>] ? autoremove_wake_function+0x0/0x30
[<ffffffff81126610>] ? khugepaged+0x0/0x10e0
[<ffffffff81126610>] ? khugepaged+0x0/0x10e0
[<ffffffff81061706>] ? kthread+0x96/0xa0
[<ffffffff8103c6af>] ? schedule_tail+0x4f/0x110
[<ffffffff81003bd4>] ? kernel_thread_helper+0x4/0x10
[<ffffffff81061670>] ? kthread+0x0/0xa0
[<ffffffff81003bd0>] ? kernel_thread_helper+0x0/0x10

Cleaning up…
Restarting all filesystems …
Restarting tasks … done.
video LNXVIDEO:00: Restoring backlight state
TuxOnIce debugging info:
– TuxOnIce core  : 3.2
– Kernel Version : 2.6.38.4-zen
– Compiler vers. : 4.4
– Attempt number : 1
– Parameters     : 17 700428 2 1 -2 4
– Overall expected compression percentage: 50.
– Compressor is ‘lzf’.
– Block I/O active.
Used 0 pages from swap on /dev/sda6.
– Max outstanding reads 1. Max writes 0.
Memory_needed: 1024 x (4096 + 360 + 112) = 4677632 bytes.
Free mem throttle point reached 0.
– Swap Allocator enabled.
Swap available for image: 2098481 pages.
– File Allocator active.
Storage available for image: 0 pages.
– No I/O speed stats available.
– Extra pages    : 0 used/500.
– Result         : Hibernation was aborted.
: Freezing filesystems and/or tasks failed.

Somehow there seems to be a problem with nvidia-drivers-270.41.06. After downgrading to nvidia-drivers-260.19.44 tuxonice worked as usual.

Addon:

This solution was partly wrong. As I noticed later, the problem still persists occasionally. With the older nvidia-driver the probability that the problem occurs just was lower. However, the main reason  for the tuxonice abort is some incompatibility between tuxonice and the new transparent hugepage feature of the kernel. As a workaround one may disable the transparent hugepage support before suspension and reenable it afterwards. I.e. one can include something like the following in his hibernate configuration:

OnSuspend 90 echo ‘never’ > /sys/kernel/mm/transparent_hugepage/enabled

OnResume 90 echo ‘always’ > /sys/kernel/mm/transparent_hugepage/enabled

or

OnResume 90 echo ‘madvise’ > /sys/kernel/mm/transparent_hugepage/enabled

Jürgen

1 Star2 Stars3 Stars4 Stars5 Stars (No Ratings Yet)
Loading...

siteinfo

Translator