After my last kernel upgrade I tried to build the iptables mirror target that I have published the last time here. The iptables mirror target takes the packet sent to your machine and returns the same packet to the machine the packet came from. Thus, let’s say someone tries to scan your machine or tries an attack (s)he would scan his own machine or even attack his own machine.
When I tried it with kernel version 6.18, it did not build anymore with the current linux kernel. This time the struct flowi4 was changed kernel 6.18. Its member flowi4_tos has been removed. Thus I had to replace the assignment to flowi4_tos with one to the new member flowi4_dscp.
You can download the newer release for kernel version 6.18 and probably future kernels here:
The kernel module has been tested with kernel version 6.18.0-zen1. To build the module, boot the kernel you want to use the module with. Afterwards unpack the archive and run the compile.sh script to build the module. Then run the install.sh script for installing the compiled module into the /lib/modules directory for your kernel. Unfortunately the mirror target does not work with iptables version 1.6 and newer due to removal of the ipt_MIRROR extension (libipt_MIRROR.so). To use the MIRROR target one has to use iptables 1.4.21 or below.
Now you may use the mirror target in place of the REJECT or DROP target in the INPUT, FORWARD and PREROUTING chains, like this in your firewall script:
$IPTABLES -A INPUT -j MIRROR
Beware: The use of the mirror target may lead to strange results, in example if you want to connect to an iptables protected machine which uses the mirror target, you may end up connecting to the local machine without recognizing it. It also may use much bandwith. The worst case occurs if you have two machines using the module. These machines may end up playing ping pong. So you have been warned, use with caution and at your own risk. For more information see: MIRROR target.
Downloads for older kernel versions are below. Notice the version numbering 2.6.25 works for kernels up to 2.6.27. 2.6.28 also works for 2.6.29 and 2.6.30 kernels. The 2.6.13 version of the module should work up to kernel version 2.6.16.
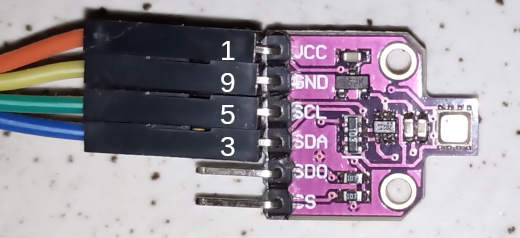
Bosch’s BME680 is a very interesting component. It is a four in one sensor, which can measure temperature, humidity, pressure and air quality. Unfortunately there is no official support for using the sensor with arm64 linux. This article shows a kernel based approach to use this sensor with NVIDIA’s arm64 based Jetson boards.
bme680 sensor breakout board which is connected to a NVIDIA Jetson TX2
Connecting the sensor First of all the sensor has to be connected to an i2c port of the Jetson board. There is no difference whether we use a TX2, Nano or Xavier board for this. The pin Layout of the Raspberry based GPIO connector (for example J12 on Xavier NX, J42 on Nano and J21 on TX2)123 is the same with all these boards. After connecting the sensor to the pins 1-9-5-3, as shown above, we can check the connection using i2detect. If we can see a device with i2c address 0x77 or 0x76 everything is connected properly.
root@jetson:/usr/src# i2cdetect -ry 1
WARNING! This program can confuse your I2C bus, cause data loss and worse!
I will probe file /dev/i2c-1 using receive byte commands.
I will probe address range 0x03-0x77.
Continue? [Y/n]
     0  1  2  3  4  5  6  7  8  9  a  b  c  d  e  f
00:          -- -- -- -- -- -- -- -- -- -- -- -- --
10: -- -- -- -- -- -- -- -- -- -- -- -- -- -- -- --
20: -- -- -- -- -- -- -- -- -- -- -- -- -- -- -- --
30: -- -- -- -- -- -- -- -- -- -- -- -- -- -- -- --
40: -- -- -- -- -- -- -- -- -- -- -- -- -- -- -- --
50: -- -- -- -- -- -- -- -- -- -- -- -- -- -- -- --
60: -- -- -- -- -- -- -- -- -- -- -- -- -- -- -- --
70: -- -- -- -- -- -- -- 77
Building the kernel modules During Google Sommer of Code 2018 Himanshu Jha has developed a kernel based driver for the bme680 sensor4. The kernel supplied by nvidia (4.9.140) does not support the BME680 sensor. Mainline kernel started supporting this sensor with version 4.19. Fortunately the required kernel module can also be built against the older NVIDIA supplied kernel. So we just have to get the kernel source of a kernel version supporting the sensor. This time we will use the most recent 4.19 kernel:
We just need to extract the drivers/iio/chemical subtree of the kernel source for building the bme680 sensors kernel module.
tar --strip-components=3 -xzf linux-4.19.116.tar.gz linux-4.19.116/drivers/iio/chemical
After extracting, we have to configure the build. To do so, prepend the following lines to the Makefile in this subtree:
CONFIG_BME680=m
CONFIG_BME680_I2C=m
Afterwards build the kernel module5 and install the binaries to the modules folder:
make -C /lib/modules/`uname -r`/build M=$PWD
make -C /lib/modules/`uname -r`/build M=$PWD modules_install
Once the kernel modules have been installed as shown above, we can load the the kernel module with modprobe bme680_i2c. This can be automated on startup by adding the module to /etc/modules-load.d/modules.conf.
Using the sensor via sysfs To use the sensor we have to register it with the kernels i2c subsystem6. This could be added to a startup script, for example /etc/rc.local.
Depending on sensor configuration the i2c address can be 0x76 or 0x77. Once the sensor is registered, the sensors readings can be acquired using the sysfs interface:
Unfortunately the kernel driver does not support the calibration of the sensor and just outputs the resistance value of the air quality sensor. So calculating CO2 equivalent or air quality from the sensors readings has to be done in userspace. Usually this calculation is being done using Bosch’s closed source BSEC library which cannot be used on arm64 architecture or within kernel context. A promising approach on self-calculating the air quality from the raw sensors readings has been shown in pimoronii forums7. According to this, the IAQ8 air quality index ranging from 0 to 500, can be calculated from the bme680 readings using the following formula:
iaq = log(gas_reading) + 0.04 * humidity_reading
For completeness, the bme680 device can be unregistered6 from the kernels i2c subsystem as follows:
After my last kernel upgrade I tried to build the iptables mirror target that I have published the last time here. The iptables mirror target takes the packet sent to your machine and returns the same packet to the machine the packet came from. Thus, let’s say someone tries to scan your machine or tries an attack he would scan his own machine or even attack his own machine.
When I tried it with kernel version 5.4, it did not build anymore with the current linux kernel. This time there has been a API change in kernel 5.0. Thus I had to replace the call to skb_make_writable() with a call to skb_ensure_writable. Furthermore a call to dst_neigh_output() had to be replaced by a call to neigh_output(). Also a small Makefile change has been necessary. Starting with kernel 5.4 the outdated SUBDIRS=$(PWD) argument gets ignored and M=$(PWD) has to be supplied instead. You can download the newer release for kernel version 5.4 and probably future kernels here:
The kernel module has been tested with kernel version 5.4.15-zen1. To build the module, boot the kernel you want to use the module with. Afterwards unpack the archive and run the compile.sh script to build the module. Then run the install.sh script for installing the compiled module into the /lib/modules directory for your kernel. Unfortunately the mirror target does not work with iptables version 1.6 and newer due to removal of the ipt_MIRROR extension (libipt_MIRROR.so). To use the MIRROR target one has to use iptables 1.4.21 or below.
Now you may use the mirror target in place of the REJECT or DROP target in the INPUT, FORWARD and PREROUTING chains, like this in your firewall script:
$IPTABLES -A INPUT -j MIRROR
Beware: The use of the mirror target may lead to strange results, in example if you want to connect to an iptables protected machine which uses the mirror target, you may end up connecting to the local machine without recognizing it. It also may use much bandwith. The worst case occurs if you have two machines using the module. These machines may end up playing ping pong. So you have been warned, use with caution and at your own risk. For more information see: MIRROR target.
Downloads for older kernel versions are below. Notice the version numbering 2.6.25 works for kernels up to 2.6.27. 2.6.28 also works for 2.6.29 and 2.6.30 kernels. The 2.6.13 version of the module should work up to kernel version 2.6.16.
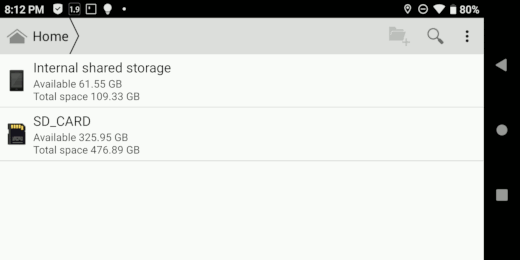
Cosmo Communicator with exfat formatted micro sd card
Unfortunately the Cosmo Communicator, like many other Android phones, does not support the exFAT filesystem. Most vendors do so due to exFAT being covered by software patents in the USA, which is a problem for companies selling to the USA. exFAT might not be the most sophisticated filesystem available, but is needed for interoperability with other devices and to get rid of the 4GB file size limit of fat32. This article shows how to enable exFAT support for the Cosmo. Since it is not much effort to also get NTFS support this is done by the way.
Setup the kernel sources
To get exfat support, first of all we need a kernel module providing exfat support. Fortunately some time ago Samsung has released their exfat driver under the GPL license. The derivate of this driver can be found on github¹ This module has to be built against the kernel used on the device. The kernel source for the Cosmo has also been made available on github². The two source trees can be combined, as described in the documentation for the exfat module by editing the relevant Makefile an Kconfig. Furthermore CONFIG_EXFAT_FS for exFAT support CONFIG_NTFS_FS for NTFS have to be enabled as modules in kernel configuration. The resulting kernel source tree with the included exfat submodule has been placed on github.
Setup the build environment
To build the kernel modules on better uses a compiler that is as near as possible to the one that has been originally for building the kernel. We can easily find this out via procfs on the target device.
clang version used for the Cosmos kernel build
When compiling on an arm64 system the build environment can easily be installed. I.e. by executing apt install llvm clang on an Ubuntu arm64 system. When using a different architecture for compiling, the appropriate cross toolchain has to be installed.
Build the kernel modules
Once all is set up the kernel modules can be built.
make O=../KERNEL_OUT -C cosmo-linux-kernel-4.4 ARCH=arm64 k71v1_64_bsp_defconfig

make -j4 O=../KERNEL_OUT ARCH=arm64  CC=clang  CLANG_TRIPLE=aarch64-linux-gnu- CROSS_COMPILE=aarch64-linux-gnu- modules
As result we get the two kernel modules ntfs.ko and exfat.ko
Creating a magisk module
The resulted kernel modules have to get loaded on Android startup. Starting with Android Pie it is not possible any more to mount the system partition for writing. One possibility would be to create an own system image containing the kernel modules and necessary scripts. Since Magisk is the recommended way for rooting the Cosmo Communicator anyways, we can take a different approach. Fortunately Magisk gives the possibility to create on overlay filesystem which gets injected into the android system partition, so we can get the same result with less effort.
To create the Magisk module containing the filesystem support we start with the Magisk Module Template4 and copy the two kernel modules to system/lib/modules/. Furthermore we need some additional binaries for filesystem checking and mounting. So we add the filesystem support binaries and volume daemon built for the Pixel 2 from fsbinaries.zip and Magisk-v18.1-extrafs.zip³. Next we need a service.sh script which loads the kernel modules on startup an restarts vold once the user is present. With an earlier restart the volumes do not get added.
#!/system/bin/sh

# load kernel modules
insmod /system/lib/modules/exfat.ko

# kernel ntfs support is ro
# comment this line to use fuse ntfs (rw)
insmod /system/lib/modules/ntfs.ko

_SLEEP_INTERVAL=2

# wait for startup
while [ "$(getprop sys.boot_completed)" != "1" ]; do
    sleep ${_SLEEP_INTERVAL}
done

# wait user to unlock
while dumpsys trust | grep -c "deviceLocked=1"; do
    sleep ${_SLEEP_INTERVAL}
    echo "device locked"
    echo $(dumpsys trust | grep -c "deviceLocked=1")
done

#kill vold to restart
killall vold
echo "vold restarted"
One can comment the line loading the ntfs module to decide whether ntfs kernel support, which is read only or fuse ntfs, which is read/write shall be used. For this a simple wrapper script replacing mount.ntfs has been added.
#!/system/bin/sh
# call mount for in kernel ntfs and mount.ntfs3g without
if cat /proc/filesystems | grep "ntfs" &> /dev/null ; then
  echo "using kernel ntfs (ro)"
  params=$(echo "$@" | sed 's/,shortname=mixed//')
  params=$(echo "$params" | sed 's/,dirsync//')
  mount $params
  echo no ntfs.ko
  mount.ntfs3g $@
else
  echo "using fuse ntfs (rw)"
  mount.ntfs3g $@
fi
Finally LATESTARTSERVICE=true has to be set config.sh to execute the service.sh script on startup and some Selinux policies have to be added to avoid the need of running in permissive mode.
The final result can be found on github. For those who do not want to perform the procedure or parts of it themselves, the installable Magisk module can be downloaded from here:
It can be installed using the Magisk Manager App. Best for all users would be if Planet Computes could include this in the stock ROM. This would give exFAT/NTFS support also for non-rooted devices. Assuming they are fearing software patents, they might consider joining the Open Invention Network to get access to the relevant Microsoft patents in the future.
Recently Adam Boardman and I have managed to integrate the modular kernel for the Gemini PDA into the gemian kernel repository. So, from now on, whenever the kernel gets improved, the modular kernel gets built and the update is available for Debian via apt.
Installing the modular kernel
From now on, the modular kernel for the Gemini PDA can be installed easily using apt:
sudo apt install gemian-modular-kernel
When using the new bootloader the kernel gets flashed to the boot partition automatically. This works because the new bootloader passes the current boot partition’s name to the kernel using the kernel cmdline. The cmdline can be examined with:
cat /proc/cmdline
When using the old bootloader with the Gemini PDA this information is not available to the kernel and consecutively to the operating system, thus one still has to flash the kernel image manually after installing or updating the kernel package. For this one has to carefully decide which boot partition the Linux system is being booted from. Using the wrong partition name can render other installed operating systems unbootable. To recover, flashing the wrongly overwritten boot partition using the flash tool might be necessary. When knowing the boot partition the new kernel can be flashed using dd (the X in bootX has to be replaced with the number of the boot partition) as shown below.
After flashing the kernel the either or the other way a reboot is necessary. The boot partition number can be determined from the scatter file that has been used initially to flash the Gemini. Alternatively it can be found out from the key combination that has been used to boot the Gemini. Detailed information on this can be found in the Gemini bootloader documentation.
Building out of tree modules
For building out of tree modules with the Gemini (in example for using USB devices that are not supported with the kernel), in addition to the kernel, the kernel-headers package has to be installed:
sudo apt install gemian-modular-kernel-headers
With the kernel headers and the appropriate build toolchain (gcc, etc.) additional kernel modules can be compiled on the Gemini. Instructions on how to do this can usually be found with the module source.
Using Debian with the Gemini PDA one can use cut and paste, for example in QTerminal, using the key combinations [Ctrl]+[Shift]+ and [Ctrl]+[Shift]+[v]. Unfortunately this did not work using the left Shift key. There is no need to fiddle with the keyboard configuration to fix this, since it is a kernel issue.
Again Adam Boardman has fixed one of the most annoying issues within the Gemini’s Linux kernel. His fix priorizes the mentioned useful keyboard combinations over the ghosted¹ versions. Again this fix is worth another kernel build. As usual, I want to share my kernel build below:
Again the kernel modules for the iptables MIRROR target (will not be usable with the default iptables version on the Gemini) and frandom are included. This time also the module for the awus1900 and similar usb wifi dongles (88XXau.ko) has been added.
Those who do not want to go through the build themselves can download my prebuild kernel from here:
Instructions for flashing the image can be found on: support.planetcom.co.uk. Make sure to use a proper scatter file, in example the one that has been used for the initial flashing. Using the Download only mode of the flash tool is sufficient. Uncheck all partitions but boot (or boot1 or boot2, depending on your boot order). For the boot partition respectively the boot1 or boot2 partition select the downloaded kernel image.
If Linux is not your primary operating system on the Gemini use boot1 or boot2 instead, depending on your partition layout.
After flashing, copy the modules archive onto your Gemini and extract it in your root directory:
cd / tar -xzf /path_to/modules_firmware-gemini-3.18.41+.tar.gz
After rebooting the device, cut and paste using the keyboard combinations should work in QTerminal. Currently I am working on getting the modular kernel configuration into the main Gemini kernel. Hopefully we manage to get this done soon. If so, this might have been the last Gemini modular kernel post.
Yesterday I have updated my Lamobo R1 router board running Debian Stretch the usual way with apt update;apt upgrade. This time many updates were involved including a kernel update from 4.9.130-2 to 4.9.144-3. After rebooting the device it did not come up again. The same happens with the 4.9.144-3 kernel and the Bananapi board which is nearly identical to the Lamobo R1.
After attaching a screen to the HDMI output I was able to see the boot messages. The last thing I noticed was that uboot was struck at “Starting kernel”. Unfortunately there has been no more useful information. Maybe one could get some more information using the serial console. Obviously the new kernel is broken for the Lamobo and the Bananapi. The corresponding bug report can be monitored on bugs.debian.org. The natural reaction is to downgrade the kernel to the previous state, which is not as simple as on Intel based devices. Since it is quite probable that others experience the same problem with the kernel upgrade I will show in the following how to recover from the upgrade.
First of all I inserted the sd card containing the operating system into a notebook and mounted the boot partition. Luckily there still has been a older backup kernel remaining from system setup. In my case this has been a 4.9.0-7 kernel. So I extracted the boot script from the boot.scr file.
dd if=boot.scr of=boot.script bs=72 skip=1
In the resulting boot.script I replaced the line
setenv fk_kvers ‘4.9.0-8-armmp-lpae’
with
setenv fk_kvers ‘4.9.0-7-armmp-lpae’
This might be different if the backup kernel available has a different version. If there is no working backup kernel, one might try to get a kernel image from a different source, in example extracting from one of the older Debian packages, from the boot partition of a second device or if one has been paranoid, from a backup.
Afterwards the boot.scr file has to be regenerated. For this the u-boot-tools package has to be present on the system used for the recovery.
mkimage -C none -A arm -T script -d boot.script boot.scr
After reinserting the card into the Lamobo R1 eventually I have been able to boot the system with the old kernel version. Afterwards it has been possible to restore the previous kernel version (4.9.130-2) with:
 MyGNU.de


![[Valid RSS]](https://validator.w3.org/feed/images/valid-rss.png "Validate my RSS feed")

