VRTrack 1.0 – headtracking driver for the vr920 HMD

As I promised in New version of the vr920 headtracking driver coming soon here is the new version of my headtracking driver for the Vuzix VR920 iwear for Linux. It calculates yaw, pitch and roll from the accelerometer and magnetometer data (The device has got three of each). This makes a 3DOF tracking possible and allows you to look around in a 3D Scene.  In example you can use the driver with my stereoscopic image viewer SIV. The driver averages the sensor readings with an improved algorithm, which gives a far smoother experience than with the initial driver version. The driver package consists of a daemon which can be run in the background and for convenience a basic control application that enables one to easily tweak the various driver settings and to callibrate the device. For general Information on how to use the device with Linux see: Vuzix VR920 with Linux and active 3D stereo.

The driver provides the trackingdata in different formats to the application using it. It always writes the data to /dev/headtracking. A line read from /dev/vrtrack consists of six floats that correspond a sensor reading in this format:

yaw pitch roll x y z

Yaw, pitch and roll are angles from 0 to 360 degrees. X, y and z are always zero for the vr920, since it only supports three degrees of freedom. These values are reserved for future devices which may support six degrees of freedom, in the hope to propose a standard for tracking devices.

The driver can scale the readings and invert the axes independantly to get the needed value range for the used application and a pleasant experience.

For maximum compatibility with existing applications there are four other modes of operation available that can be enabled separately:

  • Joystick emulation
    The driver emulates a joystick device /dev/input/jsX. The readings for yaw, pitch and roll are the X,Y and Z axis of the emulated joystick. This may be used to enable basic headtracking support in games that do not natively support headtracking.
  • Mouse emulation
    The driver emulates a joystick device /dev/input/mouseX. The readings for yaw and pitch are being translated to X and Y of the mouse device, so when you look right the mouse pointer moves to the right and when you look up the pointer moves upwards and vice versa.  This may also be used to enable basic headtracking support in games that do not natively support headtracking. It can also be used to just control the mouse pointer of the window system. Controlling the viewport of the window system can also be a resonable purpose. With the new MPX extension in xorg this may be possible.
  • UDP – network
    In UDP mode the driver sends the tracking data via network as UDP unicast. The approach to send the data out via network makes the language used for writing the application independant from the language used for developing the driver. The packet sent to the clients contains the three angles, yaw, pitch and roll and x,y and z as 32 bit fixed point in Q16.16 format. This mode may i.e. used to control flightgear.
  • Multicast – network
    In multicast mode the driver sends the tracking data via network as UDP multicast, thus many clients may read the data, which makes parallelization more possible, i.e. one could use one machine for rendering and another machine for calculations. In addition to this, the approach to send the data out via network makes the language used for writing the application independant from the language used for developing the driver. The tracking data sent to the clients contains the three angles, yaw, pitch and roll and for easy usage a viewmatrix, one can directly use with scenegraph libraries. If you intend to develop an application using the headtracking of the VR920 see the file democlient.cpp included in the download for details on how to get the data into your application. This mode is used by the stereoscopic image viewer SIV.
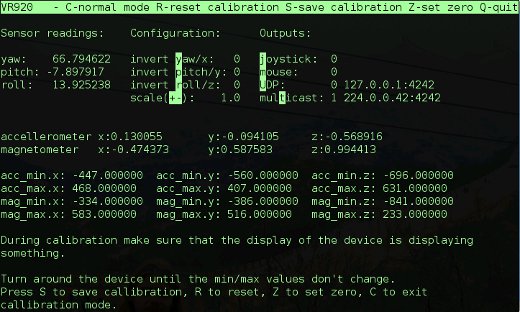
Below is a screenshot of the control application during callibration of a vr920 device:

control_app

Important note: During calibration make sure that the display of the device is displaying something. Since the displays not only showing a blue screen influences the sensor data (at least with my device) you’ll end with wrong calibration else. You may use i.e. nvidia-settings to ensure this. For detailed usage instructions see the readme included in the download.

Download:

I decided to publish the driver under the creative common noncommercial license. You may download the full source from here: vr920-driver(source) (2183 downloads ) , an x86_64 binary from here: vr920-driver(x86_64 binary) (1649 downloads ) , or an i686 binary from here: vr920-driver(i686 binary) (1797 downloads ) . An Archlinux PKGBUILD provided by Feilen is available here: aur.archlinux.org More binary/distribution specific formats may be available in the future. The x86_64 binary has been build on an up to date gentoo system, the i686 binary on ubuntu hardy. For the i686 binary you may install libconfig++ i.e. libconfig++8_1.3.2-2 from here: libconfig++ If none of the binaries works for you, you may have to build from source…

You need to have libusb, libconfig++, libfuse and libcurses installed on your system. For ubuntu users I included the small shell script ubuntu_install_deps.sh that installs the dependencies. Maybe it works also for for other Debian-based distributions. Gentoo users just have to make sure that  libusb, ncurses, fuse, and libconfig have been emerged. Your kernel version has to be at least 2.6.31 and you must have cuse enabled in your kernel.

Footnote:

If you like the driver, feel free to link to www.mygnu.de. If you developed an application using the tracking data provided by the driver please leave a comment, because then I can review the application and eventually write about it. To request commercial licenses contact us at info(at)mygnu.de. Well, if you just want to support our work on MyGNU.de use the donate button 😉

best regards

Jürgen

1 Star2 Stars3 Stars4 Stars5 Stars (1 votes, average: 5.00 out of 5)
Loading...

VR920 headtracking driver for Linux

As I promised in VR920 Headtracking driver development here comes a usable version of my headtracking driver for the Vuzix VR920 iwear for Linux. Again I want to thank MalMal of Vuzix Forums, from whose code I was able to learn how to read the Sensor data out of the device via USB. For general Information on how to use the device with Linux see:  Vuzix VR920 with Linux and active 3D stereo.

I managed to calculate yaw, pitch and roll from the accelerometer and magnetometer data (The device has got three of each). This makes a 3DOF tracking possible and would allow you to look around in a 3D Scene.

The driver sends the tracking data via network as UDP multicast, thus many clients may read the data, which makes parallelization more possible, i.e. one could use one machine for rendering and another machine for calculations. In addition to this, the approach to send the data out via network makes the language used for writing the application independant from the language used for developing the driver.

The tracking data sent to the clients contains the three angles, yaw, pitch and roll and for easy usage a viewmatrix, one can directly use with scenegraph libraries. If you intend to develop an application using the headtracking of the VR920 see the file democlient.cpp included in the download for details on how to get the data into your application.
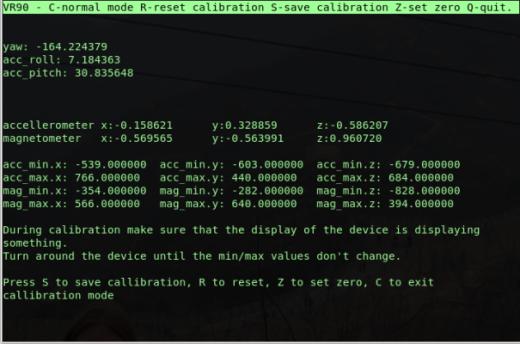
Below is a screenshot of the driver during calibration:
vr920 driver screenshot
vr920 driver during calibration ( screenshot)

Usage:

./vr920 -h vr920 [-h] [-?] [-m multicast ip] [-p multicast port] [-c calibrationfile]

On the commandline you may specify a multicast address and a port to send the data to. If you choose not to define these values the driver will send the tracking data to a sane default (224.0.0.42:4242). In any case, the client using the tracking data has to join the same address with the same port. You may decide not to use real network, if you only want to use the data on the same machine. In this case you may use loopback networking.

Add the route for the multicast address to the loopback interface:  route add -host 224.0.0.42 lo

Delete the route:  route del -host 224.0.0.42 lo

After executing the driver it instantly starts to send the trackingdata. Initially it starts in “silent” mode. You may activate/deactivate the monitor mode by pressing the M key. In monitor mode the driver displays the angles for yaw, pitch and roll. By pressing the C key you can activate/deactivate the calibration mode.

In calibration mode the driver displays  the most amount of information, the angles for yaw, pitch and roll above the normalized sensor data. Below the minima/maxima of the sensors are being displayed.The calibration works similar to the windows driver, one has to turn around the HMD (with the side-pieces open) until no minima/maxima changes anymore. Afterwards turn the device forward (the direction where you want to have the center of your view) and press the Z key to set the zero direction. Once you have completed calibration press S to store the calibration for future use. Finally press the C key again to exit calibration mode.

As default the calibration is being saved to the file .vr920 in the users home. You may specify a different filename using the -c option. If you do so this file will also be in the users home. To use i.e. a global calibration file you have to specify the full path  starting with a slash.

Important note: During calibration make sure that the display of the device is displaying something. Since the displays not only showing a blue screen influences the sensor data (at least with my device) you’ll end with wrong calibration else. You may use i.e. nvidia-settings to ensure this.

Download:

I decided to publish the driver under the creative common noncommercial license. You may download the full source from here: [download#7], an x86_64 binary from here: [download#8] , or an i686 binary from here: [download#15]. More binary formats may be available in the future. You need to have libusb, libconfig++ and libcurses installed on your system. Libconfig++ is being used to store the calibration data and libcurses for the user interface. The x86_64 binary has been build on an up to date gentoo system, the i686 binary on ubuntu hardy. For the i686 binary you will need to install libconfig++ i.e. libconfig++6_1.3.1-1 from here: libconfig++ If none of the binaries works for you, you may have to build from source…

New version available here.

Building from source:

For building from source unpack the zip and cd to vr920 and run make. If you use a binary based distribution, make sure you have the devel version of the needed libraries installed on your system.

Future Plans:

In the future I plan to extend the jps viewer I published in SIV – a stereoscopic jps viewer for Linux to use the tracking data from the driver, so one can look around the scene by turning his head.

Update: New version of SIV with headtracking support is available at: SIV-1.0 released

Footnote:

If you like the driver, feel free to link to www.mygnu.de. If you developed an application using the tracking data provided by the driver please leave a comment, because then I can review the application and eventually write about it. To request commercial licenses contact us at info(at)mygnu.de. Well, if you just want to support our work on MyGNU.de use the donate button 😉

best regards

Jürgen

1 Star2 Stars3 Stars4 Stars5 Stars (1 votes, average: 5.00 out of 5)
Loading...

SIV – a stereoscopic jps viewer for Linux

As promised in JPS-viewer for linux, here comes the very first release of  SIV, the first available  Stereoscopic  Image Viewer for Linux supporting quad buffered stereo. Well this is not 100% correct, since it is build upon OpenSceneGraph it is somewhat platform independant and schould compile well on windows, mac and unix platforms. However, I only tried with linux since there are enough alternatives available for most other platforms.

SIV is  capable of displaying jps stereo images in different stereo modes. I tried it in fullscreen/windowed mode with anaglyphic and quad buffered stereo mode. Different output devices I tested were my Vuzix VR920 and relevator shutter glasses  on Nvidia Quadro FX 350M and FX 3400. It still lacks some convenience functions like a diashow mode.

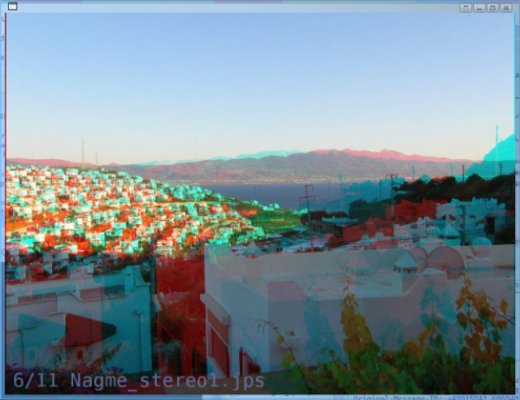
Screenshot of the viewer as window in anaglyphic mode:

jpsviewer-anaglyph

A note about the name SIV, SIV stands for Stereoscopic  Image Viewer, but as I found out Siv is also the name of the wife of the god Thor in the norse mythology. See: Wikipedia: Sif and Behindthename: Siv. Sif and Siv are the same name, both writings are possible. Once I found out this, I thought that’s a cool name for this piece of work.

Usage:

./siv [options] jpsfile(s)
Options:
–CullDrawThreadPerContext                 Select CullDrawThreadPerContext
threading model for viewer.
–CullThreadPerCameraDrawThreadPerContext  Select
CullThreadPerCameraDrawThreadPerCo-
ntext threading model for viewer.
–DrawThreadPerContext                     Select DrawThreadPerContext
threading model for viewer.
–SingleThreaded                           Select SingleThreaded threading
model for viewer.
–accum-rgb                                Request a rgb accumulator buffer
visual
–accum-rgba                               Request a rgb accumulator buffer
visual
–cc                                       Request use of compile contexts and
threads
–clear-color <color>                      Set the background color of the
viewer in the form “r,g,b[,a]”.
–display <type>                           MONITOR | POWERWALL |
REALITY_CENTER |
HEAD_MOUNTED_DISPLAY
–rgba                                     Request a RGBA color buffer visual
–samples <num>                            Request a multisample visual
–screen <num>                             Set the screen to use when multiple
screens are present.
–serialize-draw <mode>                    OFF | ON – set the serialization of
draw dispatch
–stencil                                  Request a stencil buffer visual
–stereo                                   Use default stereo mode which is
ANAGLYPHIC if not overriden by
environmental variable
–stereo <mode>                            ANAGLYPHIC | QUAD_BUFFER |
HORIZONTAL_SPLIT | VERTICAL_SPLIT |
LEFT_EYE | RIGHT_EYE |
HORIZONTAL_INTERLACE |
VERTICAL_INTERLACE | CHECKERBOARD |
ON | OFF
–window <x y w h>                         Set the position (x,y) and size
(w,h) of the viewer window.
-O <option_string>                         Provide an option string to
reader/writers used to load
databases
-e <extension>                             Load the plugin associated with
handling files with specified
extension
-h or –help                               Display this information
-l <library>                               Load the plugin

You may notice that most of the options come from osgViewer, which is the base class for the viewer. This gives the advantage, that one can use the “normal” osgViewer controls such as flying around the scene. Try holding the right mouse button and moving the mouse up or down for zooming out or in. Or press F for toggling fullscreen mode or press S for toggling the stats (fps, etc.) display.

You may supply multiple .jps files at the command line.  I.e. ./siv *.jps will display all jps files in the current folder 😉

Once the first image of the list is being displayed you may use CURSOR_UP/DOWN or the mouse wheel to select a different image for being displayed. In future versions I may implement a diashow function…

When displaying an image the filename of the image is displayed in the lower left corner.

You can find some jps images for trying out the viewer on:  Stereo Images From Juneau.

Possible Problems:

As default SIF starts in fullscreen quad buffered stereo mode. Thus if your graphics hardware does not support this mode, the viewer will exit with the following error:

Error: Not able to create requested visual.
GraphicsWindow has not been created successfully.
Viewer::realize() – failed to set up any windows

In this case try anaglyphic mode or the apropiate 3D mode for your hardware (see the –stereo option).

You may experience the application segfaulting. Most possibly the reason is that your OpenSceneGraph lacks the library  osgdb_jp2.so in the lib/osgPlugins folder. If you strace the application and the last thing it tries before segfaulting is to access osgdb_jp2.so, this is the reason. The Problem will be corrected in the next version of SIV. For now install Jasper and rebuild OpenSceneGraph.

Download:      

Do not download these files anymore unless you explicitely want this version. New version is available at: SIV-1.0 released

I decided to publish the viewer under the creative common noncommercial license. Make sure you have the OpenScenegraph library installed before trying to compile or run the viewer. You may download the full source (Eclipse Project) from here: [download#5] or an x86_64 binary from here: [download#6]. More binary formats may be available in the future. Fore the x86_64 binary you’ll need OpenSceneGraph-2.8.

Binaries for most linux distributions can be downloaded from www.openscenegraph.org.  Instructions on how to build OpenSceneGraph on gentoo can be found on PlopByte.

Building from source:

For building from source unpack the zip and cd to siv/Release and run make.

Future plans:

For the future I’d like to implement a diashow function and to integrate the VR920 headtracking into the viewer. It would be really cool to view a sea panorama image in 3D by turning the head :) This is the reason why the image is not being displayed plain, but on a cylinder segment. For the tracking I’ll have to write a driver for the VR920 headtracking  first, to get the camera viewmatrix for the viewer. Since in Vuzix Forums I found a non working driver,  from which I was able to learn how to read the sensor data, I only have to implement the neccesary calculations and calibration methods.

Well, I hope you enjoy the 3rd dimension. If you like the viewer feel free to link to MyGNU.de.

Stay tuned for updates

Jürgen

1 Star2 Stars3 Stars4 Stars5 Stars (1 votes, average: 5.00 out of 5)
Loading...

marquee script

Recently we had the task to create an animated web banner containing a marquee (in German Laufschrift) in Linux. Since we were not able to find a piece of software performing this task in an efficient way, I decided to write a small script for this. It uses ImageMagik (in my case V6.4.4.6) to generate an marquee below a supplied image and produces an animated gif as output. The script contains a config section where you may supply the input logo, the marquee text and some further settings like font and color:

# Settings

#the text for the marquee text=”+++ put the text for the marquee here +++ 0111011001101100101100011101010001001001010110010111010101 ”

#  files

#input file

logo=logo.gif

#output file

output=text.gif

#background color

background=transparent

# font settings

pointsize=20

font=./Digit.ttf

textcolor=orange

# animation settings

stepsize=6     #if possible this should be a part of the textwidth (see output) #if chosen too small this may result in too large images

delay=10       #speed

Just put in the necessary settings and run the script. You can also use the script on your web-server to update your banners with new text on the fly. You may download the script here:

[download#1] gplv3-127x51

Regards Jürgen

1 Star2 Stars3 Stars4 Stars5 Stars (No Ratings Yet)
Loading...

siteinfo

Translator